
If you’re new to the Meta Pixel, welcome to a fantastic data-gathering tool that will help you create more effective social media marketing ads in Facebook Ads Manager! This small line of code may have a significant influence on your targeting and ad spending.
It’s simple to set up and may assist you in tracking Facebook ad-driven activity on your website in order to obtain insights, analyze critical metrics, and discover target audiences.
Table of Contents
ToggleWhat is Meta Pixel?
Meta Pixel (previously known as Facebook Pixel) is a snippet of JavaScript code that, when developed and deployed on your Facebook Ads Manager account and website, allows you to follow the journey of your clients. If you’ve been wondering what the Facebook Pixel ID is, that’s the answer.
It is also known as your Facebook Pixel, Facebook Pixel ID, Meta Pixel, or Pixel ID.
Meta Pixel provides significantly more in-depth knowledge about individual audiences and how to target them most effectively. Don’t worry if you haven’t done so yet! We’ll walk you through all you need to know to get your Facebook Meta Pixel up and running, as well as how to make the most of it.
NOTE: You can only create up to 100 Pixels in your Meta Business Manager account. Be attentive while making Pixels to avoid having the incorrect ones in the wrong locations and to keep track of how many you utilize.
What Does the Meta Pixel Do?
So it’s some code…But, what exactly does the Meta Pixel do? Simply explained, it monitors website behavior as it relates to people who also use Facebook and/or Instagram. This may add a whole data platform to your targeted social media marketing, delivering a more complete view of your customers’ journey and any possible gaps.
Meta Pixel collects data by utilizing Facebook cookies. This is priceless information that may help you match visitors to your site with folks you should be targeting on Facebook Ads Manager. You may collect stats that illustrate how the consumer’s journey evolves so that you can launch targeted campaigns with the appropriate audiences as necessary. The ability to connect your sales funnel to your website and social media profiles.
The Meta Pixel automatically tracks:
- URLs and domains visited
- Devices used
- Predefined conversions
You may also utilize Meta Pixel’s other functionalities to track custom audiences, Advantage+ Catalog Ads, and custom conversions.
How to Create a (Facebook) Meta Pixel
To get the most out of your Meta Pixel, you must first make one! Simple as that. Begin by determining your Pixel’s base code. Go to your Facebook Ads Manager. From there:
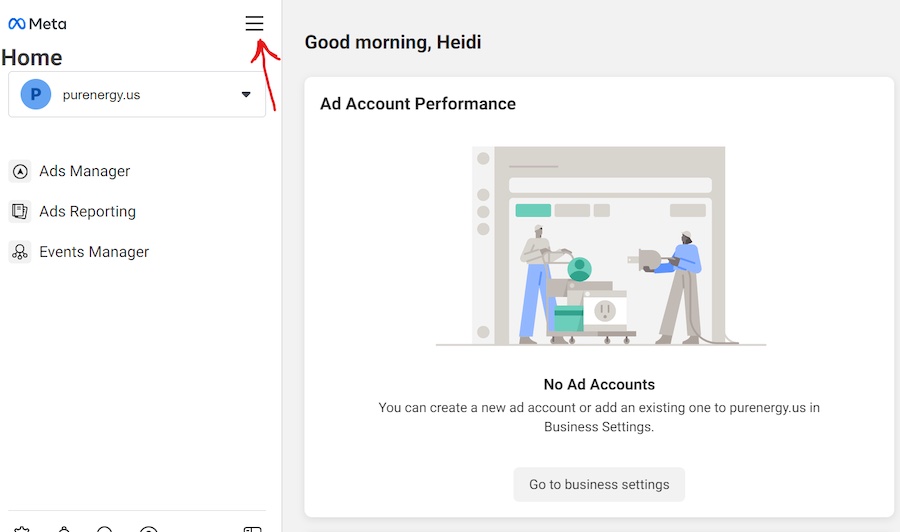
1. Click on the “All Tools” Triple Lines button.
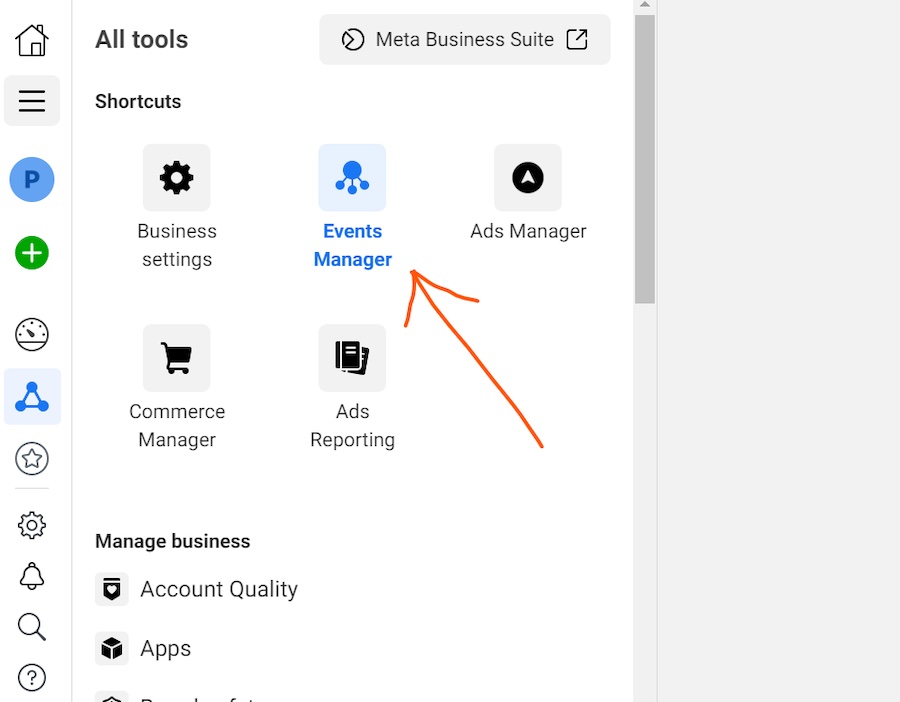
2. Click on Events Manager.
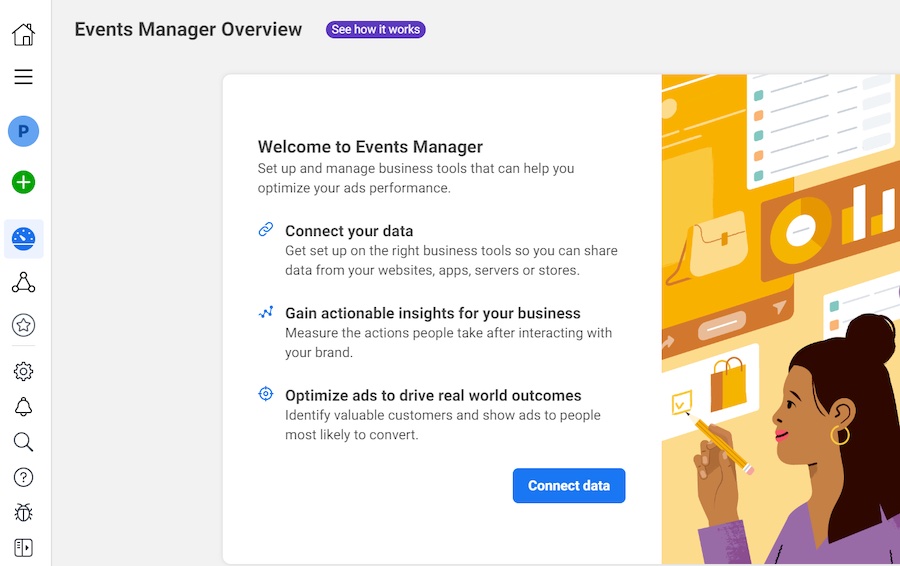
3. Click the green plus button or simply the Connect data button and select Web.
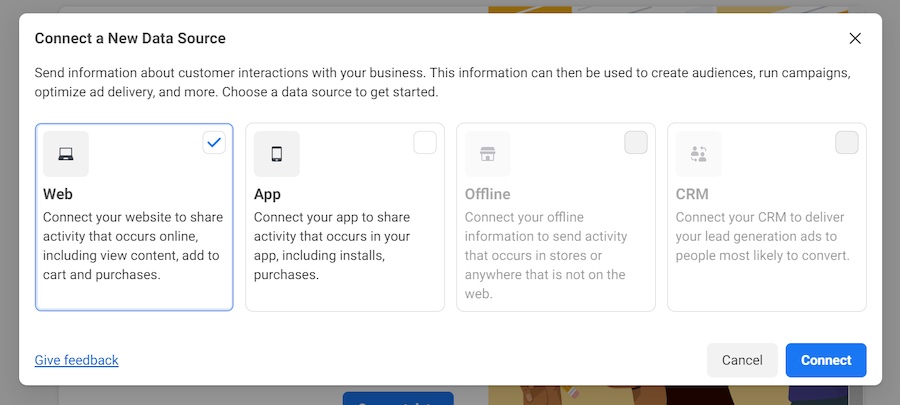
4. Then, select Facebook Pixel.
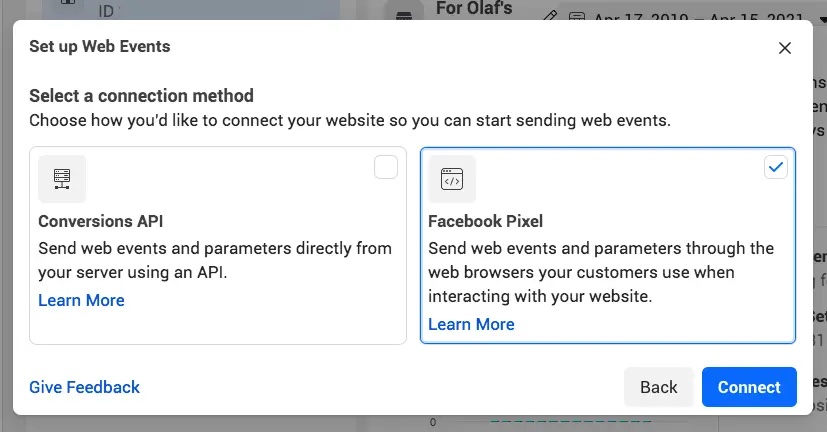
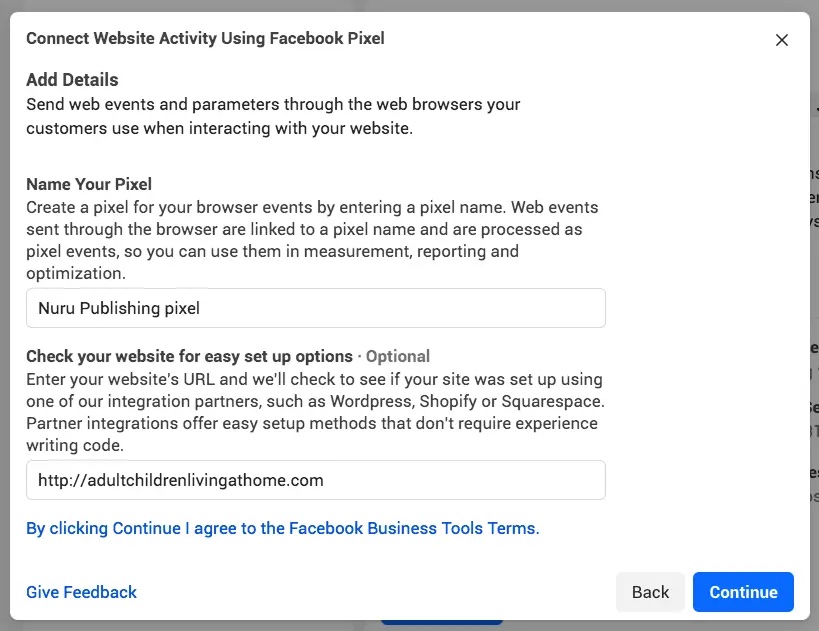
5. Create and enter a name for your Pixel. Choose a business-focused name rather than a campaign-specific moniker.
6. Enter your website URL to check for easy setup options.
7. Click Continue.
How to Install Your Facebook Meta Pixel On Your Site
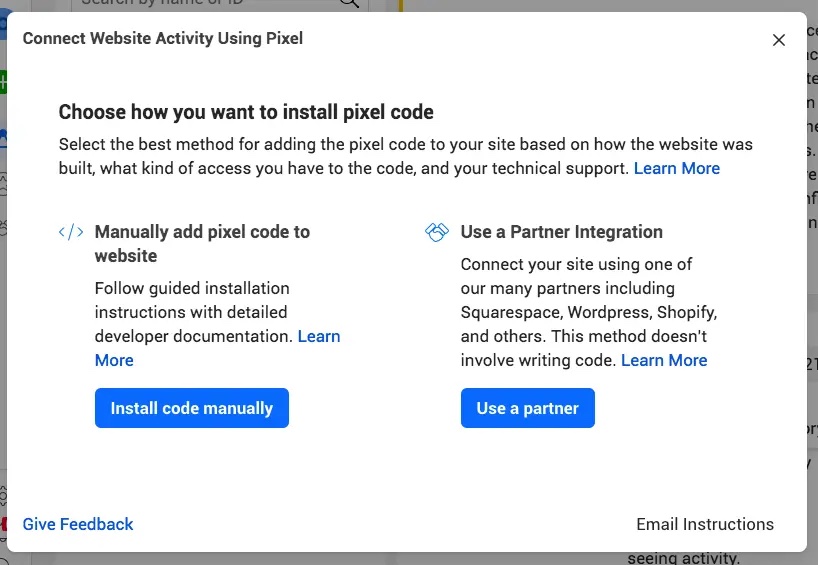
There are three basic ways to install a Facebook Pixel code on your website:
- Use one of FB’s many partner integrations (like WordPress, Wix, Shopify, Squarespace, etc).
- Manually enter the code on your site.
- Email your developer the code and instructions for installing.
HOW TO MANUALLY INSTALL (FACEBOOK) META PIXEL
1. Go to the Events Manager in your FB Business Suite.
2. Click the Data Sources icon on the left side of the page.
3. Select the Meta Pixel you want to set up.
4. Click Continue Pixel setup.
5. Select Meta Pixel and click Connect.
6. Select Install code manually.
7. Copy the pixel base code.
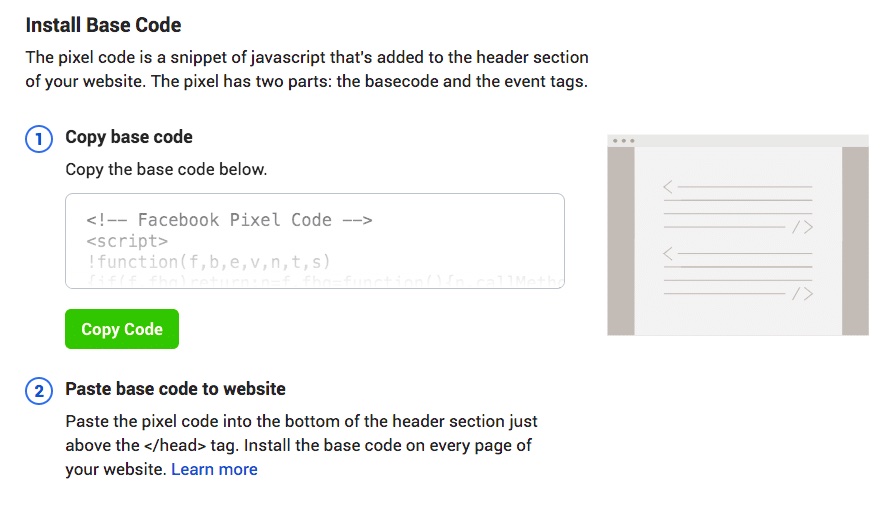
8. Find the header of your website or locate the header template in your CMS or web platform.
9. Paste the base code at the bottom of the header section, just above the closing head tag.

10. Click Continue.
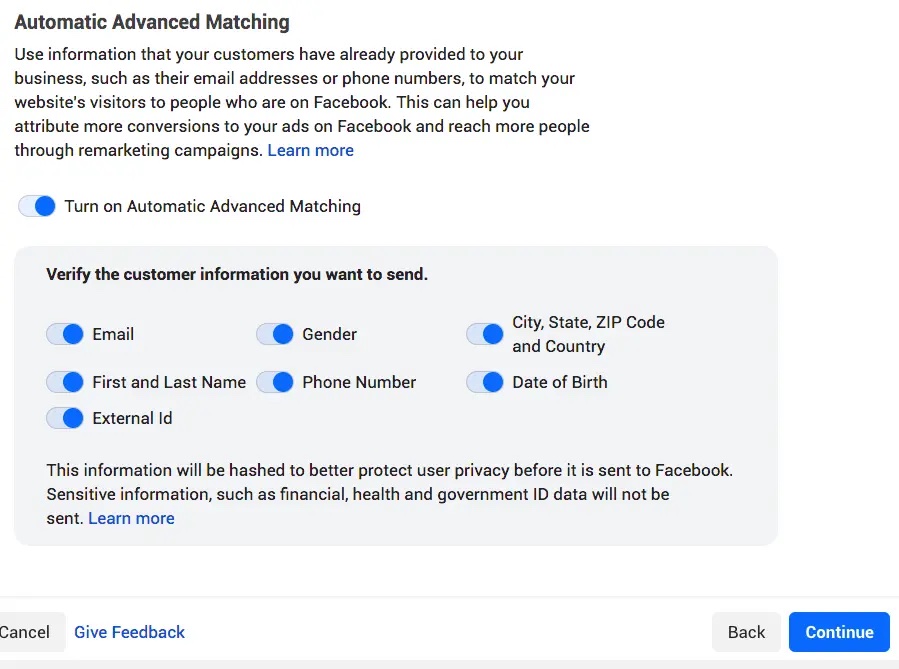
11. Make sure that at this stage, you opt to toggle on Automatic Advanced Matching so you can get data showing customers who are on FB and have visited your website. This can help you create larger custom audiences and track your sales funnel more accurately.
HOW TO INSTALL (FB) META PIXEL USING A PARTNER INTEGRATION
Here is how to install Facebook Pixel on Shopify, WordPress, or using another of Facebook’s Partner Integrations*:
- Go to Events Manager.
- Click the
Data sources icon on the left side of the page.
- Select the pixel you want to set up.
- Click Continue pixel setup.
- Click Use a partner.
- Select a partner from the list.
- Follow the onscreen setup instructions (there are also onscreen instructions for doing this straight from your Partner Integrations page under your Events Manager.)
HOW TO INSTALL (FACEBOOK) META PIXEL MANUALLY ON WORDPRESS
1. Copy the Pixel code using the instructions above.
2. Download the plugin Header Footer Code Manager (HFCM).
3. Click on HFCM in the menu on the left.
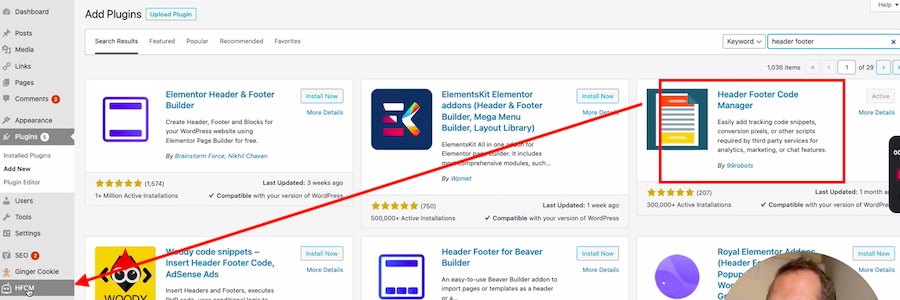
4. Add the Pixel code snippet.
5. Name the snippet (*business rather than campaign-centric name).
6. The snippet type is HTML.
7. Select Site Wide.
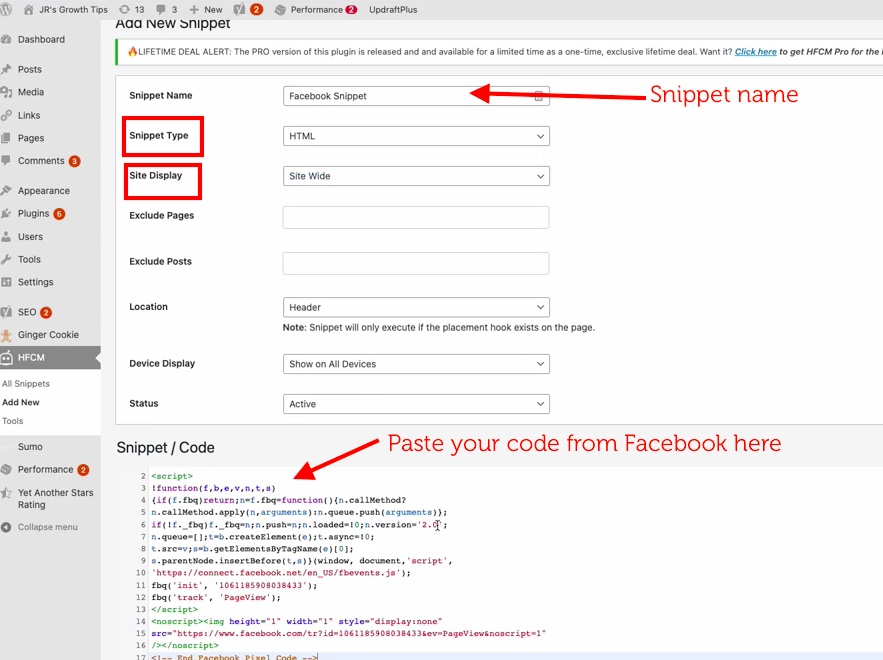
8. Paste the code you copied from Facebook in the Snippet / Code section at the bottom.
9. Click on Save.
10. Pat yourself on the back–you did it!
HOW TO INSTALL META PIXEL ON YOUR SHOPIFY SITE
To install your Facebook Meta Pixel on your Shopify site, see the section above titled, How to Install FB Pixel Using a Partner Integration.
Alternatively, you may do it via your Shopify account if you first establish your Pixel on Facebook (see steps above). Sign in to your Shopify Admin account and perform the following:
- Click on Settings > Apps and sales channels.
- From the Apps and sales channels page, click Facebook.
- Click Open sales channel.
- Click Settings.
- Click Data sharing settings.
- Under Customer data-sharing, click on Enable data-sharing toggle.
- Under Choose data-sharing level, select Standard, Enhanced, or Maximum.
- Select your pixel from the list.
- Click Confirm.
HOW TO HAVE YOUR WEB DEVELOPER INSTALL THE FACEBOOK META PIXEL
If you want your IT person or web developer to conduct the installation, you can still do it through Facebook and even send the instructions from your Events Manager!
- On Facebook, go to your Events Manager.
- Click the
Data sources tab on the left side of the page.
- Select the Meta Pixel you want to set up.
- Click Continue pixel setup.
- Click Email Instructions.
- Enter the recipient’s email address.
- Click Send at the bottom of the page.
How to Check if Your Meta Pixel is Working
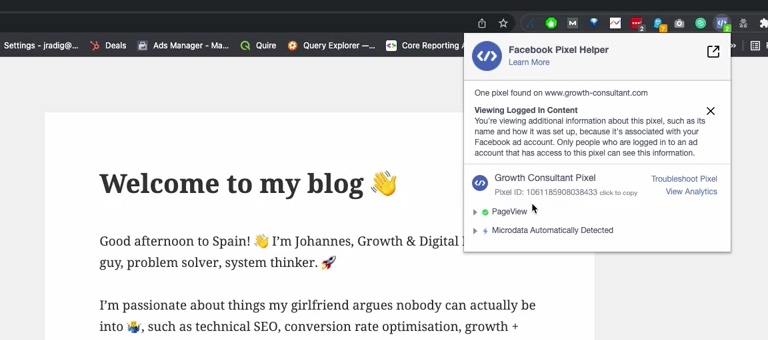
Install the Google Chrome Extension Meta Pixel Helper to determine if your Pixel is operating. Once you’ve downloaded it, navigate to the URL for which you made the Pixel and click on the Pixel Helper Extension in the upper right corner. Double-check that the Pixel ID matches the one you produced.
How to Set Up Meta Pixel in Facebook
Wait, the fun isn’t finished yet! You may now continue to set up Facebook Pixel in your FB Business Suite or Ads Manager after you’ve developed your code and uploaded it on your website.
Meta Pixel setup entails more than just putting the code out there and gathering data. To make the most of the data, you should have already selected “Automatic Advanced Matching.” This helps you to understand more about your target consumers and tailor them.
These occurrences can inform you about how your advertising are doing, allowing you to make modifications to increase your ROAS. Organizing events is simple–we’ll teach you how!
You must first validate your domain before you can add events to the Facebook Events Manager. In Events Manager, click the “Verify Domain” option to do so. This takes you to the Business Manager page. Then, click “Add” and input your primary domain. It should provide you many alternatives on how to verify. Follow the instructions by clicking on one of them.
NOTE: Domain verification might take many hours. You might try again later or the next day.
What are Pixel Events?
Paid advertising or social media marketing can also result in events. Conversions are initiated by events. Defining or identifying what defines a conversion helps you to keep track of when they occur. There are three primary ways to accomplish this using Meta Pixel, all of which entail the use of/setup of events.
Pixel featured preconfigured events that tracked topics of general interest. These are referred to as Standard Events. You may utilize several common events by indicating which pages or transactions on your site you wish to track. You may also configure Custom Events and Custom Conversions. Let’s begin with the happenings.
How to Track Conversions Using FB Meta Pixel Events
Would you think Facebook has an event setup tool? Very smart. It’s under Events Manager in your Business or Ads Manager. It is simple to use this tool and the standard events, and you do not need to add any code to your site to do so!
Select where on your website you want to add events in the Event Set Up Tool. It’s as easy as pointing and clicking. After you’ve added an event(s), you can see if it’s showing up in your Events Manager. A simple event to test is a “page view.” This also changes the status of your Pixel to “active.”

STANDARD EVENTS
There are standard events that Facebook Ads Mnager described as a result of the evident interest most marketers have in them. You can add custom events and conversions, but first see what’s currently there and ready to go for a quick “point-and-click” setup:
| Website Action | Description | Standard Event Code |
|---|---|---|
| Add payment info | The addition of customer payment information during a checkout process. For example, a person clicks on a button to save their billing information. | fbq(‘track’, ‘AddPaymentInfo’); |
| Add to cart | The addition of an item to a shopping cart or basket. For example, clicking an Add to Cart button on a website. | fbq(‘track’, ‘AddToCart’); |
| Complete registration | A submission of information by a customer in exchange for a service provided by your business. For example, signing up for an email subscription. | fbq(‘track’, ‘CompleteRegistration’); |
| Contact | A telephone, SMS, email, chat or other type of contact between a customer and your business. | fbq(‘track’, ‘Contact’); |
| Donate | The donation of funds to your organization or cause. | fbq(‘track’, ‘Donate’); |
| Initiate checkout | The start of a checkout process. For example, clicking a Checkout button. | fbq(‘track’, ‘InitiateCheckout’); |
| Lead | A submission of information by a customer with the understanding that they may be contacted at a later date by your business. For example, submitting a form or signing up for a trial. | fbq(‘track’, ‘Lead’); |
| Purchase | The completion of a purchase, usually signified by receiving order or purchase confirmation, or a transaction receipt. For example, landing on a Thank You or confirmation page. | fbq(‘track’, ‘Purchase’, {value: 0.00, currency: ‘USD’}); |
| Search | A search performed on your website, app or other property. For example, product or travel searches. | fbq(‘track’, ‘Search’); |
| Start trial | The start of a free trial of a product or service you offer. For example, trial subscription. | fbq(‘track’, ‘StartTrial’, {value: ‘0.00’, currency: ‘USD’, predicted_ltv: ‘0.00’}); |
| Submit application | The submission of an application for a product, service or program you offer. For example, a credit card, educational program or job. | fbq(‘track’, ‘SubmitApplication’); |
| Subscribe | The start of a paid subscription for a product or service you offer. | fbq(‘track’, ‘Subscribe’, {value: ‘0.00’, currency: ‘USD’, predicted_ltv: ‘0.00’}); |
Events Tracking
With a single click of your mouse, you can add any of these events to any of your web sites! This is an example of how it will appear in your site’s code:
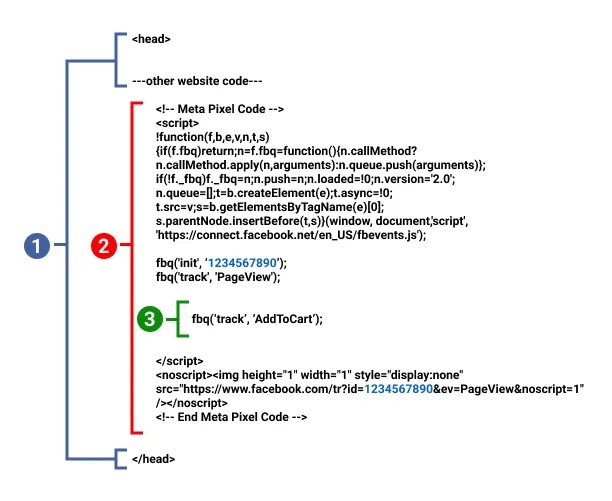
But the best part is that no code is required for these common occurrences! The Page View event is written into your Pixel’s main code and monitors every time someone views a page on your site that has the Pixel installed.
CUSTOM EVENTS
If you want something other than what is contained in Pixel’s standard events, you may create your own using coding similar to what is seen above. bespoke events can sometimes assist you in creating better bespoke audiences to target. Custom events also allow you to specify details about the event you’re creating by using optional parameters.
CUSTOM CONVERSIONS
Go to your Events Manager and select “Custom Conversions” to create a custom conversion. You will then pick the Pixel that you wish to utilize. There is a space where you may enter a rule. A rule is a requirement that must be followed in order for a conversion to be counted. It might signify that a URL was viewed, or that you wish to track form fills or email sign-ups. This is accomplished by including the URL in this rule section.
Before you can use that custom conversion as a tracking measure in a new ad, return to the Pixel in “Data Sources,” pick the Pixel you’re working with, and then under “Settings,” choose “Share with Ad Account.” When you do that,
Making the Most of Facebook Meta Pixel
That was an AWESOME amount of information! You are now an expert in the Meta Pixel! Even if you have to read it again, you should be able to:
- Create a Meta Pixel for your website.
- Install it on your site.
- Set it up on Facebook.
- Use it to track events that can offer valuable targeting insights for your marketing campaigns.

Conclusion
Finally, if you’re looking for experts in maximizing the potential of your social media marketing and marketing efforts, don’t hesitate to contact us. Our track record of effectively handling Facebook Ads Manager for several organizations in fully using the potential of digital marketing platforms such as Meta Pixel and others speaks loudly. Everything starts with a discussion. Contact us today to begin your path toward a more successful and powerful digital marketing plan. Your victory is only a phone call away.

